What is versioning of prototypes and how can you do it?

Good versioning will save you a lot of trouble
Today, we’re incredibly lucky to have such powerful, easy to use and freely available source control. Gone are the dark days of Microsoft’s SourceSafe and having to ask someone to check in a file so that you could work on it.
In modern source control software like GitHub, it’s possible to have multiple people from different disciplines work on the same code repository, make a number of changes and then stitch them back together to keep all the changes.
As interaction designers, we’re less likely to be exposed to this side of Git unless we’re lucky enough to be touching production code, or working within a team with multiple interaction and content designers.
But you’ll probably need to keep various versions of a prototype available, so that your team can look back at how things were and how they have changed between sprints in a show and tell. Or more holistically in a service assessment. At times like this, good versioning will save you a lot of trouble.
What is versioning?
Versioning is a way of keeping a series of incremented instances of your code that can be viewed at will. Each version should be a working prototype, a time capsule showing how it was when it was originally made. It should also be something that’s always available and ideally, easy to view.
There are different ways of doing this that vary in complexity, and all come with advantages and disadvantages.
Reasons for versioning a prototype
I’ve often heard people define a process for versioning and describing the benefits of their process as they try to enforce it. Sometimes, you’ll hear a call for standardisation used as a reason for versioning in a specific way. In my experience, following a strict process will not usually meet your versioning needs.
It will either not do everything you need/want it to do, or not fit into your way of working. Because of this, I believe we should articulate the goals we’re trying to achieve by versioning and then decide how we want to achieve them.
So what do we want from versioning? A way to:
- roll back our code so that we can restore it to a previous state
- experience the changes as a user
- save context so that we understand why changes were made
As well as this, we also want a cost effective way for non technical users to do all of these things.
Different ways to do it
Versioning without realising
Time for some good news. If you’re using something like GitHub, even if you’re only editing and pushing to the main branch, then you already have a way to rewind things and view previous versions of your code. Every time changes are made and committed, Git generates a hash, a seemingly random string of numbers and letters.
It’s possible to get some help from your friendly neighbourhood developer and view the history of commits, identify one and rewind your code to that point in time. In this sense, we have a working versioning that achieves some of our core goals, albeit one that’s not necessarily easy for us to use.
Using branches for versions
If you work with Git then you’re probably familiar with the concept of making branches where you will make some changes, then making a pull request to get those changes merged into the main branch. A relatively simple technique is to make a new ‘versioned branch’ after every piece of work is merged in.
The main advantage of working this way is that we can use version numbers to explicitly state the order of work. And we’ll implicitly know that version 1.x will be an earlier version than version 2.x.
This does come with a couple of disadvantages though. You’ll probably end up with tens or hundreds of branches by the time you have finished with the prototype. Making these version branches is quick, but when you consider how often you’ll be doing this, you may have written off a day to version control.
You only have a limited number of characters in the branch name to describe the changes made and why, this may be something you feel is ok at the time you are making the branch. But when you return in several months’ time you’ll struggle to identify the ‘correct’ version.
Lastly, your prototype will probably be hosted on Heroku, this gives you a single dyno to host your prototype. If you want to rewind to an earlier version and share it on the internet, then you’ll have to tell Heroku to explicitly deploy that old version. Whilst you have the old version live, you cannot effectively build, test and iterate changes in the prototype.
Making versions at key points
This is very similar to the branching idea, but we’re looking to be more picky and provide a short curated list of versions. The idea being that we can still show the iterations we have made, and we do it when significant changes or learning has happened.
This makes it easier to search through to find an appropriate version of the prototype, but it will likely have a number of changes that you may or may not want to show.
Sometimes, because of the limited number of branches, it’s possible to set up individual Heroku stacks so that all the versions can be viewed online for the duration of the project. Just be aware that there’s an additional cost with each additional version.
Saving previous versions in the prototype
This is my preferred way of working, but it does require some technical knowledge and effort. At a high level, we create our versioning within the prototype’s main branch by explicitly stating which set of pages a specific version should use.
When a user loads the prototype, the first thing they see is list of versions. Clicking into a given version allows the user to experience the prototype at that point in time.
The advantages of this are that with a single Heroku dyno, we can allow non-technical users to navigate to any version of our prototype and view it online. We also keep costs down and have a way to articulate the changes that were made and why.
How to set up your prototype
Thankfully setting up a prototype in this way is not difficult. We already have a ‘views’ and ‘routes’ folder for defining the pages within our prototype and the logic that decides what order pages are shown in. This allows us to do more advanced things, like set variables and pass them between pages. What we’re looking to do is to set up a hierarchy so that it’s clear which version should be used.
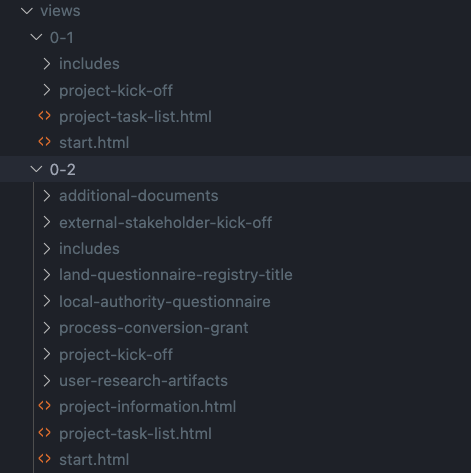
Instead of having pages within the ‘views’ folder, for version 0.1 we set up a folder structure of ‘views/0-1’. We do the same for the routes files. We set up “routes/0-1” and tell the main routes file to load these new files. Then, on the prototypes index page, rather than load “start” we make a link that loads “views/0-1/start”:
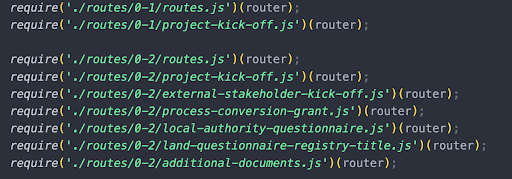
In the next sprint, when we come to iterate on the next version, we copy and paste the folders and rename them version ‘0-2’ and so on. Then we add a new link at the top of the index that links to ‘views/0-2/start’:
I’ve done my best to describe this, but sometimes it’s better to experience it by getting your hands on an example. You can view and clone a sample repository which has 2 versions of the prototype in it. Try and set up the next version of the prototype and navigate to it.
How often to version a prototype
This is where things can get a bit contentious. Some people will use sprint numbers rather than versions and iterate every sprint. I like to use a version number that I change each sprint/mid-sprint if a number of changes, or a single significant change, has been implemented.
It’s really what works best for you right now, and what will work for you in the future if you want a specific version to show in a service assessment. As long as the prototype’s regularly incremented, you’ll have a version that will meet your needs. Just increment the prototype in the way that works best for you.